
If you were blessed with curls, then you have probably discovered by now that when your hair is wet, your curls are smooth and defined, but when it's dry, it's a different story. Not only do you lose the curl definition, but you're susceptible to frizz. What you do to your hair in-between its wet and dry states is crucial to having a good mink hair day, which brings us to the curly-hair method of plopping.
What is popping?
It’s a curl-enhancing, heat-free way to dry your hair. “Hair is suspended in a setting position, like the old-fashioned pin curl or roller sets”. “But much more natural. It allows you to capitalize and enhance your own hair pattern.” You plop your wet hair after you’ve applied your style and before you start to dry your hair. It will accordion your curls, helping them keep their defined, spiral shape, even after they dry.

T-shirt VS towel
Traditional terry cloth towels “absorb too much moisture, which curly hair needs," explains Lorraine Massey, author of Curly Girl: The NEW Handbook. "The harsh fiber will ruffle the hair’s cuticle, causing frizz.” So the first step is to stop using terry cloth and opt for a t-shirt or microfiber towel instead. Both methods work, and we're not here to sell you an extra tool that you don't need so if you decide to use a t-shirt then follow the steps above for plopping with a t-shirt, and if you have a microfiber towel then we have a tutorial for you down below.
How to Plop Mink Hair Weave:
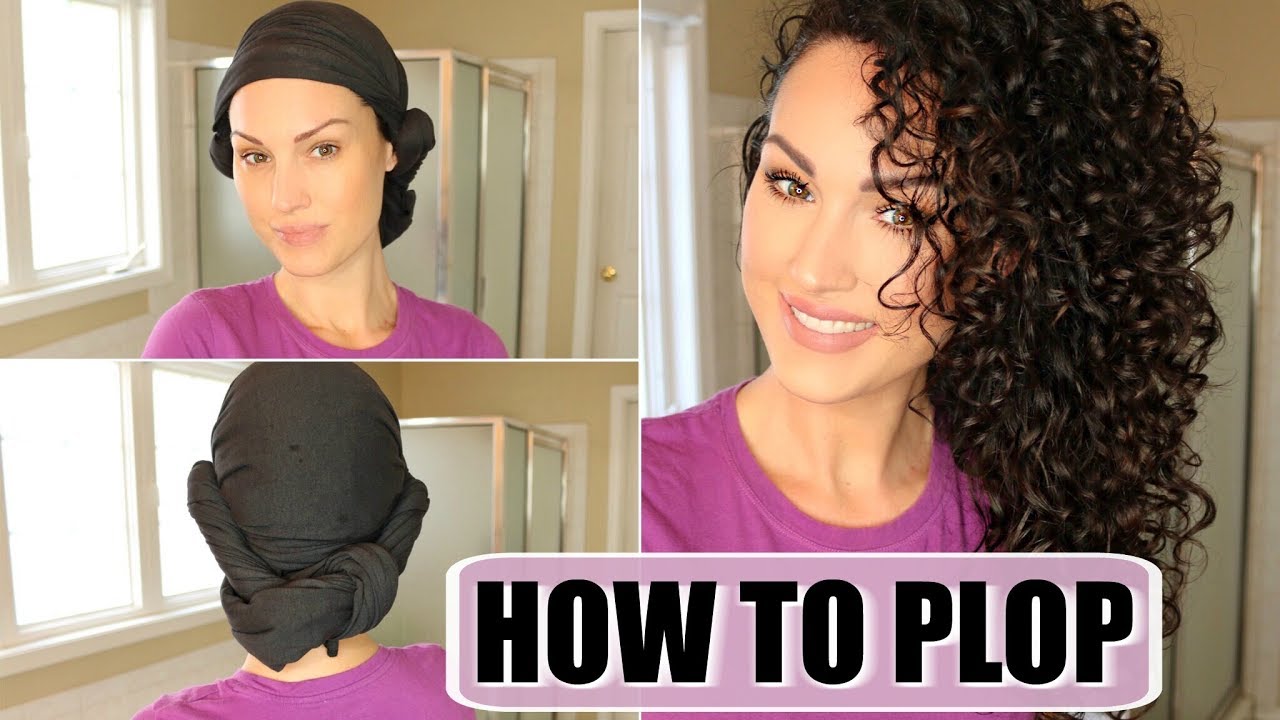
Step 1. Don’t worry about buying a specific scarf or towel to master the plop method. Look around the house for any soft, rectangular shaped fabric, like a stretchy, long-sleeved t-shirt, a jersey pillowcase (king size), or a large cotton handkerchief. The key is to use a soft material that won’t scratch the surface of your hair strands, which can create frizz. Since one of the advantages of hair plopping is that it helps with frizzy hair problems, that’s a no-go.
Step 2. Starting with clean, damp hair, apply your favorite curly hair styling product through the lengths of your hair. Then, lightly blot your curly hair with a microfiber or jersey cloth to remove excess water.
Step 3. Lay your piece of fabric on a flat surface, like your bed. (If you pick a long-sleeved tee, arrange it so the sleeves are facing you.) Next, bend over and slowly lower your hair onto the fabric, aiming the top of your head for the center. Your curls should spill onto the fabric, too.
Step 4. Once your crown makes contact, wrap the fabric around your scrunched hair. Fold the back of the material over your neck. Then gather each side, rolling it up once or twice to help the fabric fit more snugly around your hair.
Step 5. Now tie up the loose ends: Still holding each side (or sleeve), cross them behind your neck. Wrap them back around your forehead to make a final knot. Now that the fabric is secure, you can lift your head back up and tuck any hanging fabric back under the sides.
Step 6. Give your curls at least 20 minutes to set for best results. If you have more time, leave the t-shirt on overnight. By compressing the curls, the secured fabric can help them dry into curly hair that has gorgeous body and shape—without risking frizzy hair. Once you try hair plopping and see the result for yourself, you’ll never go back.
